EmailJS
Receive emails from your site with EmailJS
Published at September 04, 2023Setting up our account
EmailJS facilites the way to send emails from our page in just a few steps before to get started we must setup our email account and email template to make our form work from our page. First we need to sign up in the page below.
https://dashboard.emailjs.com/sign-upThen we can connect our account clicking on the “Add New Service” button.

After that we must signin in our desired email where we are going to receive the emails from our page, after doing that step you should see something like the image below.
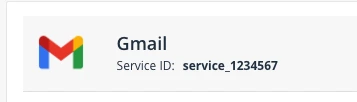
Save the “service_1234567” line we will need that later to make our form work.
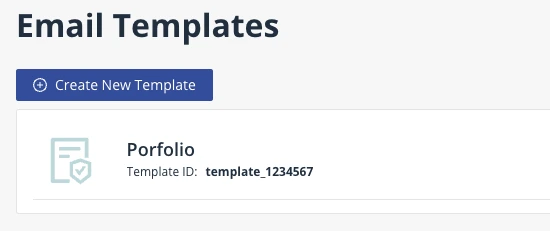
After getting the service id we must create a template for our mail, we can do it by clicking on the left sidebar in the “Email Templates” option.
Then we need to click on “Create New Template”.
Then we need to create our template, we can move every field we receive from the form by using ${{fieldnamevalue}}, heres a example of how our email template could be, feel free to customize your template this example just show how you have to place the values that will come from our form page ( name, email, message ).
IMPORTANT: dont forget to click save after make any change.
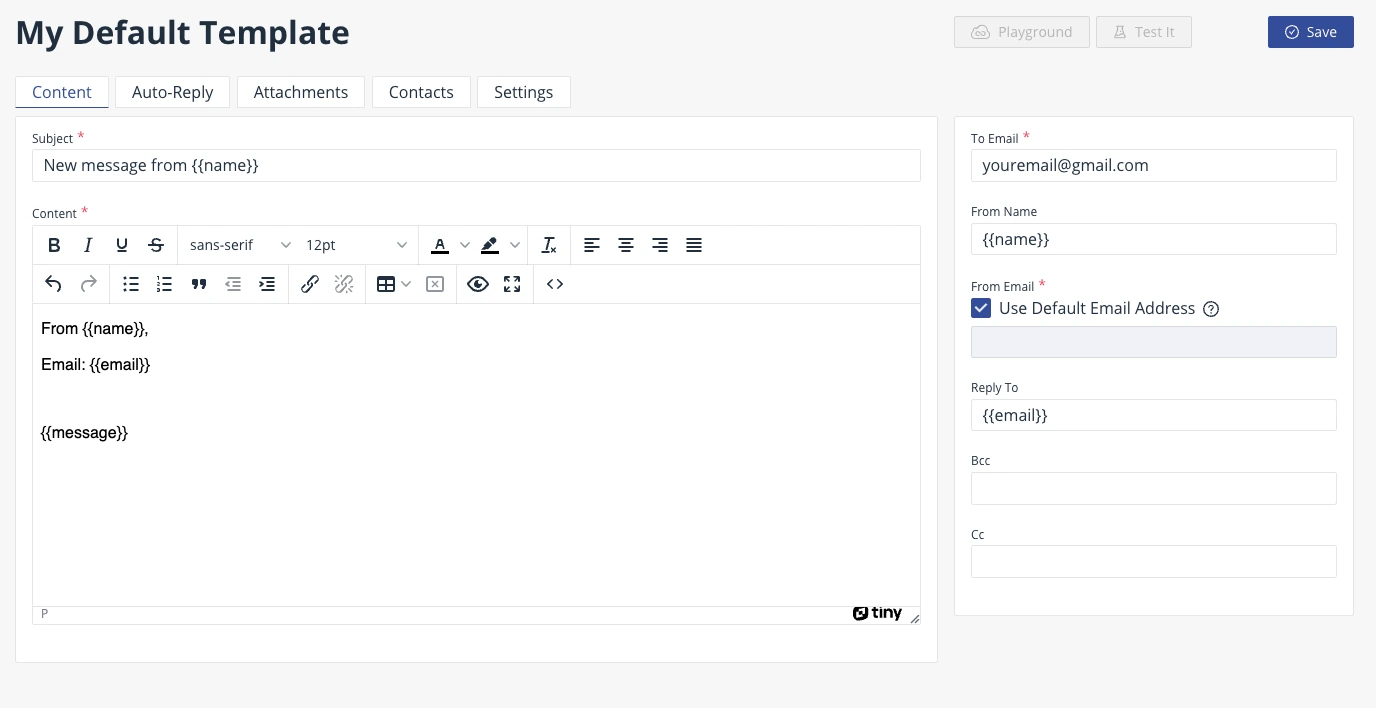
Once we finish our template, we must go to the settings tab and save our “Template ID”, that will be needed later, you can assign a name to the template if you want.

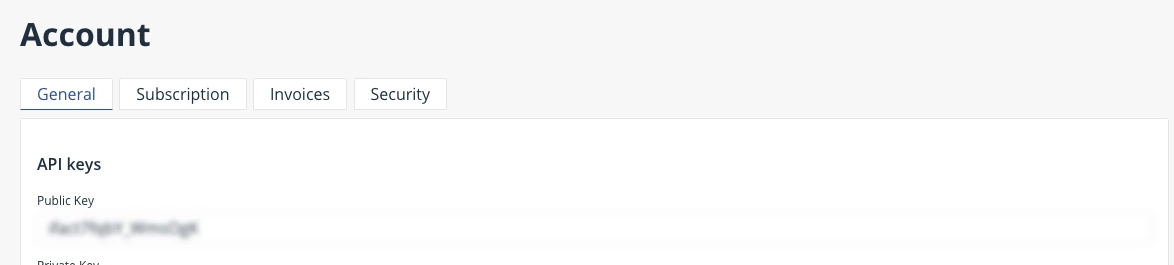
Finally we will need our “Public Key”, we can find our key by clicking in our name at the right top of the header.

Setting up our form in HTML
First we need to add the cdn or js file of emailjs.
<body>
  ...
  <script
    type="text/javascript"
    src="https://cdn.jsdelivr.net/npm/@emailjs/browser@3/dist/email.min.js"
  ></script>
</body>
Then we need to create a javascript file to manage our form.
For this example this will be done bellow our cdn script line we added previously.
We will use this basic form, styles aint needed, just focus on the form html and script function.
<head>
  <style>
    :root {
      color-scheme: dark;
    }

    form {
      display: flex;
      flex-direction: column;
      gap: 0.25em;
      width: 100%;
      max-width: 400px;
    }
  </style>
</head>
<body>
  ...
  <main>
    <form onsubmit="handleSubmit(); event.preventDefault();">
      <label for="name">Name</label>
      <input name="name" type="text" id="name" />

      <label for="email">Email</label>
      <input name="email" type="email" id="email" />

      <label for="message">Leave a Message</label>
      <textarea name="message" type="text" id="message"></textarea>

      <button type="submit">Send Message</button>
    </form>
  </main>

  <script
    type="text/javascript"
    src="https://cdn.jsdelivr.net/npm/@emailjs/browser@3/dist/email.min.js"
  ></script>
  <script type="text/javascript">
    function handleSubmit() {
      console.log("sending email...");
    }
  </script>
</body>
Creating Script ( Short Example )
This is the basic example of how to get emailjs working you can start from here to apply any custom message to the client like a toaster or show some hidden div..
...
<script type="text/javascript">
  async function handleSubmit() {
    console.log("sending email...");
    // First we will take control of the submit button to prevent double clicks
    const sendButton = document.querySelector("button[type='submit']");
    sendButton.disabled = true;

    // initialize emailjs, here goes our public Key
    emailjs.init("PUBLIC_KEY_GOES_HERE");

    try {
      // We pass our keys to the function, the last field is the selector of our form
      // If you have many forms use the id selector or class for example #contactform
      // in this example we only have one form so we can select it using "form"
      // response from emailjs is saved in res variable

      const res = await emailjs.sendForm(
        "SERVICE_ID_GOES_HERE",
        "TEMPLATE_ID_GOES_HERE",
        "form",
      );

      // if the email is sent without errors, the status will be 200
      if (res === 200) {
        console.log("Message Sent :)");
        sendButton.disabled = false;
      } else {
        console.log("Message wasnt sent");
        sendButton.disabled = false;
      }
    } catch {
      console.log("Server Error: Message wasnt sent");
      sendButton.disabled = false;
    }
  }
</script>
Example modifying the HTML DOM
changes the submit text content to show the current state and restores it to its original value
...
<script type="text/javascript">
  async function handleSubmit() {
    console.log("sending email...");
    // This is not needed but will help us to modify any state from here

    const sendMessage = "Send Message";
    const sendingMessage = "Sending Message...";
    const sendingFailed = "Oops something failed please try again later";
    const messageSent = "Message Sent :)";

    // First we will take control of the submit button to prevent double clicks
    // for this example we will be modifiying our button content to show our current state
    // check the next block to see the minimum code needed to make emailjs work on your page
    const sendButton = document.querySelector("button[type='submit']");

    // Disabled to prevent duplicated emails, we will re enable this later
    sendButton.disabled = true;

    // Change status to sending
    sendButton.textContent = sendingMessage;

    // initialize emailjs, here goes our public Key
    emailjs.init("PUBLIC_KEY_GOES_HERE");

    // this function isnt needed if you apply the state in a different way,
    // here is used to restore the send button text
    function restoreMessageButton(customMessage) {
      sendButton.textContent = customMessage;
      sendButton.disabled = true;

      const cleanId = setTimeout(() => {
        sendButton.textContent = sendMessage;
        sendButton.disabled = false;

        clearTimeout(cleanId);
      }, 2000);
    }

    try {
      // We pass our keys to the function, the last field is the selector of our form
      // If you have many forms use the id selector or class for example #contactform
      // in this example we only have one form so we can select it using "form"
      // response from emailjs is saved in res variable

      const res = await emailjs.sendForm(
        "SERVICE_ID_GOES_HERE",
        "TEMPLATE_ID_GOES_HERE",
        "form",
      );

      // if the email is sent without errors, the status will be 200
      if (res.status === 200) {
        // we change our state to sent
        // you can add more code here if the response is ok

        // for this example will be using settimeout, to clean our button, you can avoid that by using a
        // toaster animation or applying the message to some part of the html

        restoreMessageButton(messageSent);
      } else {
        restoreMessageButton(sendingFailed);
      }
    } catch {
      restoreMessageButton("Server Error: Please try again later");
    }
  }
</script>
Limits
EmailJS simplifies our way to send emails from our page to our email but there are some limits
- only 200 emails per month, every month at the same day that we used the service the service will be renewed.
- 2 email templates maximum, we can create other email template but we are limited to only 2
Pros
- We can validate the response from EmailJS and show the client the right UI for each response
- We are not attached to other pages this will be sent from our page
Cons
- Setup might be a little complex if you dont know fetching in javascript or manage the HTML DOM
- Only 200 emails available per month, if your email flow is closest or higher, this might not be the best option for your site ( check prices ).